
July 10, 2012
Random Posts Widget For Blogger

Random Posts Widget For Blogger i.e each time the page of your blog refreshes the posts on the blog showed by this widget changes, means this widgets always shows unique posts from your blog with unique combinations at random,i.e the widget selects the posts randomly from all your blog posts and never knows which post might it pick from your blog to show.Really this is the gem of the widget you really should show on your blog for sure.
As before this i had blogged about a one more random posts widget in which a link was made and clicking on it would show random post in blog.

Now how to add this widget in the blog.
1. Log into Blogger >> Layout >> Html/Javascript .
2.Then paste this code in it.
<script type="text/javascript">
var randarray = new Array();var l=0;var flag;
var numofpost=6;function randomposts(json){
var total = parseInt(json.feed.openSearch$totalResults.$t,10);
for(i=0;i < numofpost;){flag=0;randarray.length=numofpost;l=Math.floor(Math.random()*total);for(j in randarray){if(l==randarray[j]){ flag=1;}}
if(flag==0&&l!=0){randarray[i++]=l;}}document.write('<ul>');
for(n in randarray){ var p=randarray[n];var entry=json.feed.entry[p-1];
for(k=0; k < entry.link.length; k++){if(entry.link[k].rel=='alternate'){var item = "<li>" + "<a href=" + entry.link[k].href + ">" + entry.title.$t + "</a> </li>";
document.write(item);}}
}document.write('</ul>');}
</script>
<script src="/feeds/posts/default?alt=json-in-script&start-index=1&max-results=1000&callback=randomposts" type="text/javascript"></script>
Change the the text no in red above in codes to select how many random posts you want to display.
And Save the Widget.Now you will be shown up the the title of the posts in widget like you see in recent posts, recent comments or popular posts widget and all the posts will be picked randomly.
Now How to show random posts title with post summary.
Just open this script or download this Random Post Script.
Either host it to your server or use this script only.
You can get Free File Host Here.
1. Log into Blogger >> Layout >> Html/Javascript .
2.Then paste this code in it.
var randarray = new Array();var l=0;var flag;
var numofpost=5;var wordnumber=5;</script>
<script style="text/javascript" src="http://btemplatescripts.googlecode.com/files/random-posts-with-summary.js">
</script>
<script src="/feeds/posts/default?alt=json-in-script&start-index=1&max-results=1000&callback=randomposts" type="text/javascript"></script>
Just change the green url with your script url which you uploaded to your server,if you want.
Alter the codes in red in above codes to adjust the count of posts and and how much word summary you want up to show up in the widget.Thats it so Simple.If you have any problems leave your comments below.
Credits for widget to Bloggodown.

Posted in Blogger , Blogger hacks , Blogspot , javaScripts , Tutorials
July 8, 2012
Adding Yahoo Smileys on Blogger Posts and Widgets V.2

To add yahoo smileys emoticon on your posts and widgets , just follow two simple steps:
1. Adding CSS Code
2. Adding JavaScript code
Adding CSS Code
1. Go to your Dashboard > Template > Edit HTML2. Add bellow code just before ]]></b:skin>
<!-- Yahoo Smileys on Posts and Widgets by Don ZikkO Code Start-->
img.bhsmly {
    height: auto !important;
    vertical-align: middle !important;
    width: auto !important;
    border:0px !important;
}
<!-- Yahoo Smileys Code End-->
Adding JavaScript
1. Add bellow code after]]></b:skin><!-- Yahoo Smileys Script on Posts and Widgets by Don ZikkO --> <script src='http://bloggerhack.googlecode.com/files/ysmileyspostwidget.js' type='text/javascript'/>2. Save the template, and done...

Posted in Blogger , Blogger hacks , Blogspot
Adding Yahoo Smiley on Blogger Threaded Comments
1. Adding CSS Code
2. Adding JavaScript code
3. Adding HTML code
Adding CSS Code
1. Go to Blogger Dashbord > Template > Edit HTML2. Click on Expand Widgets tick box
3. Add bellow code just before
]]></b:skin><!-- Yahoo Smileys by DonZikkO Code Start-->
.bloggerhackysmile {
background: none repeat scroll 0 0 #EFF5FB !important;
font-size: medium !important;
padding: 10px !important;
text-align: left !important;
font-weight:bold !important;
font-size:11px !important;
}
img.bhacksmly {
height: auto !important;
vertical-align: middle !important;
width: auto !important;
border:0px !important;
}
<!-- Yahoo Smileys Code End-->
Adding JavaScript
1. Search for</body> tag2. Addlbellow code before
</body> and Save Template. <!-- Yahoo Smileys Script Don ZikkO--> <script src='http://bloggerhack.googlecode.com/files/ysmiley_fixed.js' type='text/javascript'/>With two steps above, you have added Yahoo Smiley on your Blogger Comments. But smileys doesn't appear above your comment form. To show smileys and codes, follow the last instruction about Adding HTML code.
Adding HTML code
1 Search for bellow tag.<div class='post-footer-line post-footer-line-3'> code... </div> </b:includable>2.Add below code between
</div>and </b:includable><!-- Yahoo Smileys by Don ZikkO Star--> <b:if cond='data:blog.pageType == "item"'> <div style='background-color:#FEF8EC; border:none; width:100%; padding:10px; height:100px; overflow:auto;'> <div class='bloggerhackysmile'> <img alt='' class='bhacksmly' src='http://l.yimg.com/us.yimg.com/i/mesg/emoticons7/1.gif'/> :) <img alt='' class='bhacksmly' src='http://l.yimg.com/us.yimg.com/i/mesg/emoticons7/2.gif'/> :( <img alt='' class='bhacksmly' src='http://l.yimg.com/us.yimg.com/i/mesg/emoticons7/3.gif'/> ;) <img alt='' class='bhacksmly' src='http://l.yimg.com/us.yimg.com/i/mesg/emoticons7/4.gif'/> :D <img alt='' class='bhacksmly' src='http://l.yimg.com/us.yimg.com/i/mesg/emoticons7/5.gif'/> ;;-) <img alt='' class='bhacksmly' src='http://l.yimg.com/us.yimg.com/i/mesg/emoticons7/7.gif'/> :-/ <img alt='' class='bhacksmly' src='http://l.yimg.com/us.yimg.com/i/mesg/emoticons7/8.gif'/> :x <img alt='' class='bhacksmly' src='http://l.yimg.com/us.yimg.com/i/mesg/emoticons7/10.gif'/> :P <img alt='' class='bhacksmly' src='http://l.yimg.com/us.yimg.com/i/mesg/emoticons7/11.gif'/> :-* <img alt='' class='bhacksmly' src='http://l.yimg.com/us.yimg.com/i/mesg/emoticons7/12.gif'/> =(( <img alt='' class='bhacksmly' src='http://l.yimg.com/us.yimg.com/i/mesg/emoticons7/13.gif'/> :-O <img alt='' class='bhacksmly' src='http://l.yimg.com/us.yimg.com/i/mesg/emoticons7/14.gif'/> X( <img alt='' class='bhacksmly' src='http://l.yimg.com/us.yimg.com/i/mesg/emoticons7/15.gif'/> :7 <img alt='' class='bhacksmly' src='http://l.yimg.com/us.yimg.com/i/mesg/emoticons7/16.gif'/> B-) <img alt='' class='bhacksmly' src='http://l.yimg.com/us.yimg.com/i/mesg/emoticons7/17.gif'/> :-S <img alt='' class='bhacksmly' src='http://l.yimg.com/us.yimg.com/i/mesg/emoticons7/18.gif'/> #:-S <img alt='' class='bhacksmly' src='http://l.yimg.com/us.yimg.com/i/mesg/emoticons7/19.gif'/> 7:) <img alt='' class='bhacksmly' src='http://l.yimg.com/us.yimg.com/i/mesg/emoticons7/20.gif'/> :(( <img alt='' class='bhacksmly' src='http://l.yimg.com/us.yimg.com/i/mesg/emoticons7/21.gif'/> :)) <img alt='' class='bhacksmly' src='http://l.yimg.com/us.yimg.com/i/mesg/emoticons7/22.gif'/> :| <img alt='' class='bhacksmly' src='http://l.yimg.com/us.yimg.com/i/mesg/emoticons7/23.gif'/> /:) <img alt='' class='bhacksmly' src='http://l.yimg.com/us.yimg.com/i/mesg/emoticons7/24.gif'/> =)) <img alt='' class='bhacksmly' src='http://l.yimg.com/us.yimg.com/i/mesg/emoticons7/25.gif'/> O:-) <img alt='' class='bhacksmly' src='http://l.yimg.com/us.yimg.com/i/mesg/emoticons7/26.gif'/> :-B <img alt='' class='bhacksmly' src='http://l.yimg.com/us.yimg.com/i/mesg/emoticons7/27.gif'/> =; <img alt='' class='bhacksmly' src='http://l.yimg.com/us.yimg.com/i/mesg/emoticons7/101.gif'/> :-c <img alt='' class='bhacksmly' src='http://l.yimg.com/us.yimg.com/i/mesg/emoticons7/100.gif'/> :)] <img alt='' class='bhacksmly' src='http://l.yimg.com/us.yimg.com/i/mesg/emoticons7/102.gif'/> ~X( <img alt='' class='bhacksmly' src='http://l.yimg.com/us.yimg.com/i/mesg/emoticons7/103.gif'/> :-h <img alt='' class='bhacksmly' src='http://l.yimg.com/us.yimg.com/i/mesg/emoticons7/104.gif'/> :-t <img alt='' class='bhacksmly' src='http://l.yimg.com/us.yimg.com/i/mesg/emoticons7/105.gif'/> 8-7 <img alt='' class='bhacksmly' src='http://l.yimg.com/us.yimg.com/i/mesg/emoticons7/28.gif'/> I-) <img alt='' class='bhacksmly' src='http://l.yimg.com/us.yimg.com/i/mesg/emoticons7/29.gif'/> 8-| <img alt='' class='bhacksmly' src='http://l.yimg.com/us.yimg.com/i/mesg/emoticons7/29.gif'/> L-) <img alt='' class='bhacksmly' src='http://l.yimg.com/us.yimg.com/i/mesg/emoticons7/31.gif'/> :-a <img alt='' class='bhacksmly' src='http://l.yimg.com/us.yimg.com/i/mesg/emoticons7/32.gif'/> :-$ <img alt='' class='bhacksmly' src='http://l.yimg.com/us.yimg.com/i/mesg/emoticons7/33.gif'/> [-( <img alt='' class='bhacksmly' src='http://l.yimg.com/us.yimg.com/i/mesg/emoticons7/34.gif'/> :O) <img alt='' class='bhacksmly' src='http://l.yimg.com/us.yimg.com/i/mesg/emoticons7/35.gif'/> 8- <img alt='' class='bhacksmly' src='http://l.yimg.com/us.yimg.com/i/mesg/emoticons7/36.gif'/> 2:-P <img alt='' class='bhacksmly' src='http://l.yimg.com/us.yimg.com/i/mesg/emoticons7/37.gif'/> (:| <img alt='' class='bhacksmly' src='http://l.yimg.com/us.yimg.com/i/mesg/emoticons7/38.gif'/> =P~ <img alt='' class='bhacksmly' src='http://l.yimg.com/us.yimg.com/i/mesg/emoticons7/39.gif'/> <img alt='' class='bhacksmly' src='http://l.yimg.com/us.yimg.com/i/mesg/emoticons7/40.gif'/> #-o <img alt='' class='bhacksmly' src='http://l.yimg.com/us.yimg.com/i/mesg/emoticons7/41.gif'/> =D7 <img alt='' class='bhacksmly' src='http://l.yimg.com/us.yimg.com/i/mesg/emoticons7/42.gif'/> :-SS <img alt='' class='bhacksmly' src='http://l.yimg.com/us.yimg.com/i/mesg/emoticons7/43.gif'/> @-) <img alt='' class='bhacksmly' src='http://l.yimg.com/us.yimg.com/i/mesg/emoticons7/44.gif'/> :^o <img alt='' class='bhacksmly' src='http://l.yimg.com/us.yimg.com/i/mesg/emoticons7/45.gif'/> :-w <img alt='' class='bhacksmly' src='http://l.yimg.com/us.yimg.com/i/mesg/emoticons7/47.gif'/> 7:P <img alt='' class='bhacksmly' src='http://l.yimg.com/us.yimg.com/i/mesg/emoticons7/48.gif'/> 2):) <img alt='' class='bhacksmly' src='http://l.yimg.com/us.yimg.com/i/mesg/emoticons7/109.gif'/> X_X <img alt='' class='bhacksmly' src='http://l.yimg.com/us.yimg.com/i/mesg/emoticons7/110.gif'/> :!! <img alt='' class='bhacksmly' src='http://l.yimg.com/us.yimg.com/i/mesg/emoticons7/111.gif'/> \m/ <img alt='' class='bhacksmly' src='http://l.yimg.com/us.yimg.com/i/mesg/emoticons7/112.gif'/> :-q <img alt='' class='bhacksmly' src='http://l.yimg.com/us.yimg.com/i/mesg/emoticons7/113.gif'/> :-bd <img alt='' class='bhacksmly' src='http://l.yimg.com/us.yimg.com/i/mesg/emoticons7/114.gif'/> ^#(^ <img alt='' class='bhacksmly' src='http://l.yimg.com/a/i/us/msg/emoticons/pirate_2.gif'/> :ar! </div></div></b:if> <!-- Yahoo Smileys by Don ZikkO End-->3. Save t he template, and you are done..
Posted in Blogger , Blogger hacks , Blogspot
How To Enable Threaded Comments on Blogger / Blogspot
How To Enable Threaded Comments on Blogger / Blogspot
As mentioned on Blogger buzz official site, you have to setup your blog. “Blog Feed” set to “Full”, and are using “Embedded” comments, then you’re ready to start a discussion with your readers.Blogger New Interface
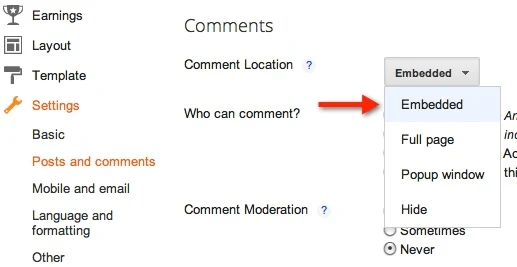
1. Go to Dashboard , select your blog.2. Go to Settings > Posts and Comments
3. Comment Location option set to Embedded
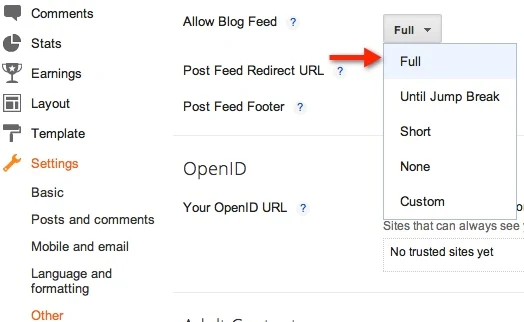
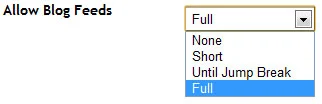
4. Go to Settings > Other
5. Allow Blog Feed option set to Full
Blogger Old Interface
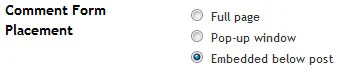
1. Go to Dashboard, select your blog.2. Go to Settings > Comments
3. Comment Form Placement option set to Embedded below post
4. Go to Settings > Site Feed
5. Allow Blog Feed option set to Full
STILL NOT GETTING THREADED COMMENTS?
If sou still not getting threaded comments, let's two alternative method for Standard Templates and Costumized Templates.Standard Templates
1. Go to Design > Edit HTML2. Click on Revert widget templates to default link
You can do this step for Costumized Templates, but this will Discard the all Changes Widget and revert to Default
Costumized Templates
1. Go to Template > Edit HTML2. Click on Expand Widget Templates check box
3. Find the Following code
<b:if cond='data:blog.pageType == "static_page"'> <b:include data='post' name='comments'/> </b:if> <b:if cond='data:blog.pageType == "item"'> <b:include data='post' name='comments'/> </b:if>4. You will get two results. Replace both code with following code
<b:if cond='data:blog.pageType == "static_page"'> <b:if cond='data:post.showThreadedComments'> <b:include data='post' name='threaded_comments'/> <b:else/> b:include data='post' name='comments'/> </b:if> </b:if> <b:if cond='data:blog.pageType == "item"'> <b:if cond='data:post.showThreadedComments'> <b:include data='post' name='threaded_comments'/> <b:else/> <b:include data='post' name='comments'/> </b:if> </b:if>5. Save the Template!
Still getting problem? Share your comment here!
Posted in Blogger , Blogger hacks , Blogspot


