
September 6, 2014
How to backup Blogger template
You want to backup your template every time you want to tinker with the code. Better yet always keep a latest version of your template stored in your PC.
Now that you understand the importance of having a template backup, let’s start doing it:
Backing up a template
- Log in to your Blogger account (if you haven’t logged in already).
- Go to Dashboard > Design > Edit HTML. Your screen will look like this:
- Click the Expand Widget Templates checkbox.
- Position your cursor inside the code window and right click and choose Select All.
- Copy the code and paste it in Notepad or other text editor. For the sake of this tutorial, let’s name the file MyTemplateBackup.txt.
- Keep the file in a safe place.
- That’s it, you’ve backed up your blog template!

Restoring a template
Now whenever you want to restore your template, simply- Repeat step 1 to 3 above.
- Open MyTemplateBackup.txt., Select All and copy.
- Position cursor inside your template code window, right click and Select All.
- Click Paste. The template code will be replaced by the code from MyTemplateBackup.txt.
- … and your template is restored.
Before you leave:
- Do you find this article useful? Share it via Retweet, Share and Stumble buttons below.
- Any suggestion, question or comment? Please post it in the comments below.

Posted in Blogger hacks , Blogger Templates , Blogging Tips , Blogspot
Embed Youtube Videos On Your WordPress or Blogger Blog

Embedding with a URL

For More Information on How to Embed YouTube Videos On WordPress, Visit the Official WordPress Support Site For Better Understanding.
Posted in Blogger hacks , Blogger Templates , Blogging Tips , Blogspot , WordPress Tips
October 3, 2012
Adding Disqus Comment Box on Blogger/Blogspot Blog

If you are looking to add more professional looking and functional commenting system to your Blogger/Blogspot blog checkout Disqus. It is a universal commenting system that is more user friendly and very easy to manage from Disqus interface.
Many friends said that the comments on blogger would be lost, it did't. There are ways to import old comments to Disqus.
If you want to install the Disqus comment box, follow these steps:
1. Go to Disqus website
2. Click Sign Up at the top right corner
3. Fill the blank, then click Continue
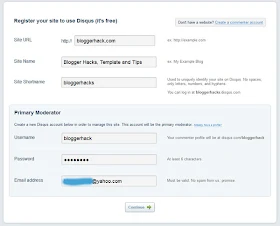
4. Add your twitter account (optional)
5. Click on Blogger
6. Add Site
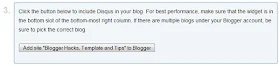
7. If you have several blogs, please select the blog then Add Widget
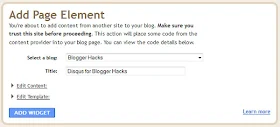
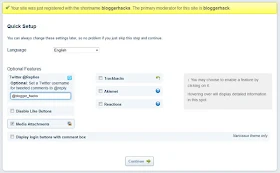
8. It's automatically adds widgets to your blog
9. Open your email and confirm email, by clicking a link in an email
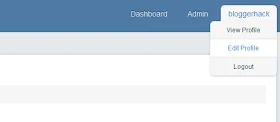
10. Click your username, then Edit Profile
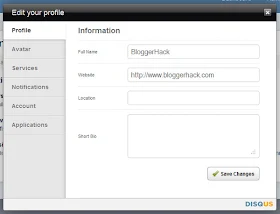
11. Edit Your Profile, Avatar and others.
New comment form has more field like we usually have on WordPress powered blogs. Comments are neatly formatted and you can subscribe to RSS feed to follow up comments. Besides, users of Disqus can directly comment on your blog using their repestive IDs for more connected approach. You can moderate comment on blog by logging into account at Disqus website. Give Blogger comment box a Disqus makeover! My Comment Form is a good example of how the Disqus comment form looks like....
I hope this helps.
If you have anything to say or ask, Kindly make use of the comment form below. If you also want me to post a short review of your company or product, on this blog, do not hesitate to contact me.
Please, do not forget to SUBSCRIBE to this blog, so that you can be receiving future articles, freebies DIRECTLY into your email inbox, even when you are not online.
CLICK HERE TO SUBSCRIBE NOW!
Cheers!
Posted in Blogger , Blogger hacks , Blogger Templates , Blogging Tips , Blogspot
October 1, 2012
Adding Facebook Share or Like Button in Blogger Templates(New Blogger Layout)
Sites like facebook brings more traffic when properly linked in 1 way or the other to facebook...
Adding Facebook Share/Like Button Below Post Title
To add the Facebook Like button below post title, simply follow these steps:- Login to your blogger dashboard, firstly, it is necessary that you backup your blogger template before you try editing it incase you mess up with the template.
- Click the Edit HTML button.

- A new window will be opened. Click on the Proceed button and start editing.

- Check the Expand Widget Templates option.
- Find <head> in your template and replace it with the following code
:<head> <script>(function(d, s, id) { var js, fjs = d.getElementsByTagName(s)[0]; if (d.getElementById(id)) return; js = d.createElement(s); js.id = id; js.src = "//connect.facebook.net/en_US/all.js#xfbml=1"; fjs.parentNode.insertBefore(js, fjs); }(document, 'script', 'facebook-jssdk'));</script> - Now find the following code:
You might see multiple codes similar to the above code. However, make sure that the code you find has <b:includable id=’post’ var=’post’> in it.<b:includable id='post' var='post'> <div class='post hentry' itemscope='itemscope' itemtype='http://schema.org/BlogPosting'> <a expr:name='data:post.id'/> <b:if cond='data:post.title'> <h3 class='post-title entry-title' itemprop='name'> <b:if cond='data:post.link'> <a expr:href='data:post.link'><data:post.title/></a> <b:else/> <b:if cond='data:post.url'> <b:if cond='data:blog.url != data:post.url'> <a expr:href='data:post.url'><data:post.title/></a> <b:else/> <data:post.title/> </b:if> <b:else/> <data:post.title/> </b:if> </b:if> </h3> </b:if>
Tip: Search for <data:post.title/> and you’ll find the above code lines. - Place the following code right AFTER the code in previous step:
The result should look something like this:<b:if cond='data:blog.pageType == "item"'> <div class='fb-like' data-send='false' data-show-faces='true' data-width='450'/> </b:if>
<b:includable id='post' var='post'> <div class='post hentry' itemscope='itemscope' itemtype='http://schema.org/BlogPosting'> <a expr:name='data:post.id'/> <b:if cond='data:post.title'> <h3 class='post-title entry-title' itemprop='name'> <b:if cond='data:post.link'> <a expr:href='data:post.link'><data:post.title/></a> <b:else/> <b:if cond='data:post.url'> <b:if cond='data:blog.url != data:post.url'> <a expr:href='data:post.url'><data:post.title/></a> <b:else/> <data:post.title/> </b:if> <b:else/> <data:post.title/> </b:if> </b:if> </h3> </b:if> <b:if cond='data:blog.pageType == "item"'> <div class='fb-like' data-send='false' data-show-faces='true' data-width='450'/> </b:if> - Save your template and view posts on your blog, your facebook like button would appear.
Adding Facebook Share Button Below Post Body
To place the Facebook share button under each post, you have to follow the first 3 steps given above. Then find the code given in step 4 above. Scroll down a bit and you’ll see the following code: <div class='post-body entry-content' expr:id='"post-body-" + data:post.id' itemprop='articleBody'> <data:post.body/> <div style='clear: both;'/> <!-- clear for photos floats --> </div>After finding the above code, place the following code right AFTER it:
<b:if cond='data:blog.pageType == "item"'> <div class='fb-like' data-send='false' data-show-faces='true' data-width='450'/> </b:if> <div class='post-body entry-content' expr:id='"post-body-" + data:post.id' itemprop='articleBody'> <data:post.body/> <div style='clear: both;'/> <!-- clear for photos floats --> </div> <b:if cond='data:blog.pageType == "item"'> <div class='fb-like' data-send='false' data-show-faces='true' data-width='450'/> </b:if>Posted in Blogger , Blogger hacks , Blogger Templates , Blogging Tips , Blogspot , Facebook , FaceBook Tip/Trickz
September 26, 2012
Add your blogger blog to yahoo

One of the most important ways to attract traffic to your site is to ensure that your Blogger (Blogspot) blog is properly indexed by popular search engines such as Yahoo. If you want to increase your chances of having your site quickly indexed by the Yahoo search engine it pays to submit your site and your feed. In this tutorial we will be covering the process of signing up with Yahoo, authenticating your site and adding your site feed to Yahoo Site Explorer.
Yahoo can be notoriously slow at indexing and will not necessarily include all crawled pages in its search results. For guaranteed inclusion you can opt for a paid service but if you follow the steps below you have a good chance of having your Blogger blog properly indexed relatively quickly and without any cost.
1. Sign up for a free Yahoo Account if you don't already have one.
2. Sign in to Yahoo Site Explorer where you will be taken to the MySites page.
3. Submit your Blogger website by entering the URL of your blog and then clicking on the Add My Site button.

4. You will now see your website address included in the site list. The 3 columns to the right contain information about feeds, actions, and status. You will notice that the status of your site will be set to new (represented by a yellow circle). Click on the link to your site or click the Explore button.
5. You will be taken to the results page and should get a message like the one pictured below.

6. From the menu on the left click on the Authentication
7. You will be presented with 2 authentication options. Choose Add a META Tag from the dropdown menu then copy the code provided using Ctrl + C.
8. In a new window of your browser login to your Blogger blog. Keep the window of Site Explorer open as we will be returning.
9. Navigate to Layout > Edit HTML in your Blogger (Blogspot) blog
10. When you arrive at the Template page it is a good idea to make a backup of your site's template as a precaution. Go ahead and download it your computer by clicking on the Download Template link. Remember if you inadvertently overwrite some code you may not be able to restore your template so it is worth taking an extra few moments to do this step.
11. Once you have backed up your site locate the Head tag. It will be only a few lines of code down from the top. Now insert the copied code from Yahoo in the position suggested as shown in the picture below using the Ctrl + V command.

12. Once you have pasted the code into the template there is still one further action needed. You will need to add a trailing slash at the end of the new line of code to avoid getting a parse error. Once you have added the trailing slash and are certain you have placed the code in the correct position go ahead and click on the Save Template button.

13. Return to Yahoo Site Explorer and follow the mysite link. You will see that the status of your site has been verified and is represented by a green checkmark.
14. From the lefthand menu select Feeds. You will be taken to the feeds page where you can go ahead and add a feed for your blog by entering the URL of the feed. Notice in the example below I have set an extra parameter to handle redirection of the feed by services such as Feedburner.

15. Once the feed has been accepted it takes around 24 hours before it is active. After this time and provided there are no errors Yahoo displays "processed" followed by a green tick as can be seen in the picture below.

You have now completed the steps involved in having your Blogger (Blogspot) blog crawled and indexed by Yahoo. All that is left to do is to check back periodically to see if Yahoo has indexed your pages. This process can take time so don't expect overnight results. However once Yahoo recognises your feed your pages will be regularly crawled and any updates in content indexed. The process of adding a feed and verifying your site will have gone a long way towards ensuring your site is included in Yahoo search engine results.
Tips for Adding Blogger Blog to Yahoo Site Explorer
Tips for Submitting Your Blogger Blog to Yahoo
Yahoo Search Engine Optimisation for Blogspot Bloggers
SEO For Blogger Blogs with Yahoo
Faster indexing of your Blogger Blog by Yahoo
How to Ensure Your Blogger Blog is Indexed by Yahoo
Speed Up Indexing of Your Blogger Blog by Yahoo
Yahoo Search Engine and Blogger Blogs
In this tutorial you have learned how to submit your Blogger (Blogspot) blog to Yahoo Site Explorer by authenicating your site and adding a feed which Yahoo can use as a sitemap to improve its indexing of your pages.
Thanks to Gtek! For the images...
Posted in Blogger , Blogger hacks , Blogger Templates , Blogging Tips , Blogspot , S.E.O
July 15, 2012
Blogger Related Posts with Thumbnails: LinkWithin

Keep your readers engaged with LinkWithin related posts with thumbnails widget. The related posts thumbnails will appear under each post, linking to related stories from your blog archive. It will make your old posts accessible to new or casual readers of your blog, thus increasing traffic.
This tutorial will show you how to install LinkWithin widget to a Blogger blog. I’m splitting this tutorial into two sections -one is for installing default widget and another one is for installing custom widget.
Before proceeding with this widget, you might want to read about another related posts widget: nRelate Related Posts plugin. nRelate’s widget allows more customization, and has a posts reindex option.
a) Installing default LinkWithin widget
Adding a default widget is actually pretty straightforward.Go to LinkWithin.
- Enter your email address and blog URL.
- Select Blogger for the platform and select the number of stories.
- Click Get Widget! and the widget will be added to your blog.
- Done! The related posts thumbnails and links should appear under each post now.
b) Installing custom LinkWithin widget
If you would like to customize the widget, proceed with the rest of this tutorial. You can change the placement of the related posts thumbnails and the phrase that appears above them. You can also specify on which pages they should appear.Here we go,
I. Get your Site Id
Go to LinkWithin.
- Perform the same steps (steps 2 to 4) as in a) above, except this time choose Other for the platform.
- You will be given a code snippet, similar to the snapshot.
- Don’t copy the code. Just jot down or copy the Site Id number for later use.
II. Adding in the widget code
- Login to your Blogger account.
- Go to Dashboard > Design > Edit HTML.
- Back up your template.
- Copy the code below and paste it right before
</body>tag in your template:
<b:if cond='data:blog.pageType == "item"'> <script> var linkwithin_site_id = SITE ID NUMBER; linkwithin_text='YOUR CUSTOM PHRASE'; </script> <script src="http://www.linkwithin.com/widget.js"></script> <a href="http://www.linkwithin.com/"><img src="http://www.linkwithin.com/pixel.png" alt="Related Posts with Thumbnails" style="border: 0" /></a> </b:if>
- Put your Site Id number in code line 3.
- Change the “You might also like:” phrase with your own phrase in code line 4.
- The code above will make the related posts appear only on post pages. If you want to display them on all pages, just remove code line 1 and 8.
- Put your Site Id number in code line 3.
- Save and view your blog.
III. Repositioning related posts display (optional)
By default the related posts thumbnails will appear after each post body, ABOVE the post footer. That means it appears (in most cases) above your labels, comments link and timestamp.A few users mentioned that they prefer the thumbnails to appear BELOW the post footer, and asked me how can they make it so.
So here it is folks. Follow these steps to place the related posts at the very end of your post section:
- In Design > Edit HTML, with Expand Widget Templates checkbox ticked, find the following code:
<b:include data='post' name='post'/>
- Add
<div class="linkwithin_div"></div>right after the line, like so:
<b:include data='post' name='post'/>
<div class="linkwithin_div"></div>
- Click Save. You're done!
Posted in Blogger , Blogger hacks , Blogger Templates , Blogging Tips , Blogspot
How To Customize Related Posts Plugin: nRelate for Blogger

There are a few options for related posts plugins out there, but the most customizable one is provided by nRelate. nRelate is a free tool for websites of all sizes and customization is very easy (with no confusing coding on your part) on platforms such as Blogger, WordPress and Tumblr. While nRelate for WordPress is the easiest platform to customize the plugin with, nRelate for Blogger is just as easy but is a little more involved and requires a few extra steps, which I will explain in detail throughout this post.
Benefits
Besides an increase in site traffic and easy customization options, there are a few other benefits of using nRelate’s related posts plugin:- No re-directs. Unlike some other related posts plugins, nRelate does not re-direct any of your internal links through it’s own site, so that you always get credit for all your internal ‘link juice’.
- Re-index your site at any time. If you delete certain posts or articles and no longer want them to appear as a related post suggestion, you can clear your related posts cache with nRelate’s built-in ‘re-index’ option so their servers can then re-analyze your site and generate all new links to related posts.
- Analytics reporting feature. Everyone who uses the nRelate plugin has access to the built in analytics reporting page, which displays all impressions, clicks, and other data so you can measure your increase in page views.
- Hosted on nRelate’s own servers. Some other related posts plugins slow down your page’s loading time, but nRelate is supported on its own servers so this won’t be a problem.
How To Install and Customize nRelate Plugin For Blogger
Step 1: Install the Plugin
- Go to partners.nrelate.com and register. You’ll need to register if you want to customize the plugin for Blogger.
- Go to the Install tab and choose your platform: Blogger.
- Enter your site’s URL (make sure to include http:// and .blogspot.com) and click Submit.
- Then choose if you want to display the plugin on posts as well as the homepage, or only on posts.
- Once you click Install, your Blogger dashboard will then open in a new window or tab. Click Add Widget and then Save.


Step 2: Customize Your Settings
You can customize your settings through the nRelate Partners Site under Manage Settings > Blogger where they give you a countless number of customization options.- Here, you can choose your thumbnail size, how many thumbnails you want to display (up to 10), as well as how far back in your archive you would like to go for related posts.
- They give you the option to support nRelate by displaying their logo within the plugin.
- You can also choose to display sponsored ads within the plugin if you want to make some extra money with your site.
- Additionally, you can choose to share related posts from external sites from your blogroll or any other sites you wish.

Step 3: Choose Your Thumbnail Style
- Go to Manage Settings > Blogger > Blogger Style Gallery.
- Pick out the thumbnail style you want to use and follow the directions to change the style. All you will need to do is some simple copy and paste. Here are some examples of available theme options:
- Go to your Blogger Dashboard > Design and click Edit on the ‘nRelate’ box. An edit box should pop up.
- Change the highlighted part of the code to the new css code that nRelate provides for you. For example, if you want to use the ‘trendland’ theme, you would change the highlighted code to:
http://static.nrelate.com/common_b/0.01.0/nrelate-panels-tre.min.css


That’s all there is to it! Now you can have a related posts plugin that is not only useful, but stylish too.
Posted in Blogger , Blogger hacks , Blogger Templates , Blogging Tips , Blogspot


