
September 14, 2025
Why Temporary File Hosting Services Are Essential for Modern Digital Privacy
The Hidden Risks of Permanent File Sharing
When you upload files to traditional cloud storage services or permanent file sharing platforms, those files often remain on servers indefinitely. Even after you delete them from your account, copies may persist in backups, caches, or recovery systems. This permanent storage creates several risks:
Data Persistence Beyond Your Control
Most major cloud platforms retain deleted files for extended periods, sometimes years, in their backup systems. While this can be helpful for legitimate recovery purposes, it also means your sensitive information remains vulnerable long after you intended to share it.
Privacy Policy Changes
Companies frequently update their privacy policies and terms of service. Files you uploaded under one set of privacy protections may later be subject to different rules, potentially exposing your data in ways you never agreed to.
Security Breaches and Data Leaks
The longer files remain stored on servers, the greater the risk they'll be compromised in a security breach. High-profile data leaks have exposed millions of files that users thought were safely stored or had been deleted.
Unintended Access and Sharing
Permanent file storage increases the likelihood that files will be accessed by unintended parties, whether through misconfigured sharing settings, account compromises, or internal data misuse.
How Temporary File Hosting Solves These Problems
Temporary file hosting services operate on a fundamentally different principle: files are automatically deleted after a predetermined period, typically ranging from one hour to several days. This approach offers several compelling advantages:
Automatic Data Expiration
The most obvious benefit is that your files are guaranteed to be deleted from servers after the expiration period. This eliminates the risk of long-term data persistence and reduces your digital footprint.
Reduced Attack Surface
With files automatically removed from servers, the window of opportunity for potential attacks or unauthorized access is dramatically reduced. Even if a service experiences a security breach, the impact is minimized because most files have already been automatically deleted.
Privacy by Design
Temporary file hosting inherently prioritizes privacy by limiting data retention. This approach aligns with privacy regulations like GDPR, which emphasize data minimization and purpose limitation.
No Account Required
Many temporary file hosting services don't require user accounts, eliminating the need to provide personal information and reducing the risk of your sharing activity being tracked or profiled.
Key Features to Look For
When choosing a temporary file hosting service, several features are essential for maintaining security and privacy:
Flexible Expiration Options
Look for services that offer multiple expiration timeframes. Different situations require different sharing durations – a quick document review might need only an hour, while a collaborative project might require several days.
Strong Security Measures
The service should implement robust security features including:
- HTTPS encryption for all data transmission
- Server-side encryption for stored files
- Protection against malicious file uploads
- Rate limiting to prevent abuse
No Registration Requirements
Services that allow anonymous uploading and sharing provide the highest level of privacy, as they don't collect personal information or track user behavior.
Clear Privacy Policies
Transparent privacy policies that explicitly state data retention practices and deletion procedures are essential. The policy should clearly outline what happens to your files and when they're permanently removed.
File Size and Type Flexibility
A good service should support various file types and reasonable size limits to accommodate different sharing needs without forcing users to compromise on security by using less secure alternatives.
Practical Use Cases for Temporary File Hosting
Temporary file hosting services excel in numerous scenarios:
Business Collaboration
When sharing sensitive business documents with clients or partners, temporary hosting ensures that files don't remain accessible indefinitely. This is particularly important for confidential proposals, contracts, or financial information.
Creative Projects
Designers, photographers, and other creatives often need to share large files for review and approval. Temporary hosting allows for quick sharing without cluttering permanent storage or risking unauthorized use of creative assets.
Technical Documentation
Software developers and IT professionals frequently share configuration files, logs, or documentation that may contain sensitive system information. Temporary hosting ensures this information doesn't persist longer than necessary.
Personal File Sharing
For personal use, temporary hosting is ideal for sharing photos, videos, or documents with friends and family without worrying about long-term storage or privacy implications.
A Leading Example: TempFile.org
One service that exemplifies best practices in temporary file hosting is TempFile.org. This privacy-first platform demonstrates how temporary file hosting should work:
Privacy-Focused Design: TempFile.org operates without requiring user registration, ensuring complete anonymity for users. Files are automatically deleted after the chosen time period (1-48 hours), with no permanent storage or backup retention.
Robust Security: The service implements comprehensive security measures including HTTPS encryption, file validation, rate limiting, and protection against malicious uploads. These features ensure that both users and recipients are protected.
User-Friendly Interface: Despite its strong security focus, TempFile.org maintains an intuitive interface that makes file sharing straightforward without compromising on security features.
Flexible Options: Users can choose expiration times ranging from 1 to 48 hours, allowing for appropriate data retention based on specific sharing needs.
Best Practices for Secure Temporary File Sharing
To maximize security when using temporary file hosting services:
Choose Appropriate Expiration Times
Set expiration periods as short as practical for your needs. If a file only needs to be accessible for a few hours, don't set it to expire in several days.
Use Additional Encryption for Sensitive Files
For highly sensitive information, consider encrypting files locally before uploading, adding an extra layer of protection.
Verify File Deletion
Some services provide confirmation when files are automatically deleted. Take advantage of these features when available.
Be Mindful of File Content
Even with temporary hosting, avoid sharing information that could be harmful if intercepted during the brief storage period.
Use Secure Communication Channels
When sharing download links, use encrypted messaging apps or email to ensure the links themselves aren't intercepted.
The Future of Privacy-Conscious File Sharing
As privacy concerns continue to grow and regulations become more stringent, temporary file hosting represents the future of secure file sharing. The principle of data minimization – keeping data only as long as necessary – is becoming a legal requirement in many jurisdictions and a practical necessity for privacy protection.
Organizations are increasingly recognizing that permanent storage of shared files creates unnecessary liability and risk. Temporary file hosting services provide a solution that balances functionality with privacy, allowing for efficient collaboration without compromising long-term data security.
Conclusion
In an era where digital privacy is increasingly under threat, temporary file hosting services offer a practical solution for secure file sharing. By automatically deleting files after predetermined periods, these services minimize digital footprints, reduce security risks, and align with modern privacy principles.
Services like TempFile.org demonstrate that privacy and functionality don't have to be mutually exclusive. By choosing temporary file hosting for your sharing needs, you're taking a proactive step toward better digital privacy while maintaining the convenience and efficiency that modern file sharing requires.
The next time you need to share files, consider whether permanent storage is truly necessary. In most cases, temporary hosting provides all the functionality you need with significantly better privacy protection. Your future self – and your data security – will thank you for making the more privacy-conscious choice.
This article was written to help readers understand the importance of privacy-conscious file sharing. For more information about secure temporary file hosting, visit TempFile.org – a free, privacy-first service that automatically deletes your files after your chosen time period.

Posted in tempfile , tempfile upload , temporary file
June 8, 2024
MetaTv APK Download Updated Latest Version 2024 Apk For Android
In the digital age, streaming has become synonymous with entertainment. MetaTv APK emerges as a beacon for movie enthusiasts and TV show aficionados, offering an expansive collection of HD content. As we navigate through 2024, MetaTv APK continues to be a preferred choice for seamless streaming on various devices.
MetaTv APK: A Versatile Streaming Solution
MetaTv APK is not just another streaming app; it’s a versatile platform that supports a wide array of devices, ensuring that high-quality entertainment is always at your fingertips:
Download Link: https://metatvapk.com
For Android Users: The MetaTv APK file caters to all Android devices, providing a personalized streaming experience.
On Your PC: Whether you’re using Windows 32-bit or 64-bit, MetaTv APK can be installed using an Android emulator or directly via the MetaTv.exe file.
Smart TVs and Android TV Boxes: High-resolution content is available for Android TVs and TV boxes, with simple installation steps. FireStick and Other Devices: MetaTv APK extends its reach to devices like Amazon FireStick, offering HD content on HDMI-supported TVs.
Installation and Accessibility
Download Link: https://metatvapk.com
MetaTv APK’s installation process is straightforward. For Android users, downloading the latest version, such as v1.0.1, ensures the best experience. The app is not available on Google Play Store, but it can be downloaded from trusted third-party websites.
FAQs: Addressing Your Curiosities
Is MetaTv shut down? No, MetaTv is up and running, with continuous updates to enhance your streaming experience.
Why isn’t MetaTv working? If you encounter issues, ensure you’re using the latest version. If problems persist, check your internet connection or reinstall the app.
Why does MetaTv buffer so much? Buffering can occur due to slow internet speeds or high traffic on the server. Try streaming during off-peak hours or upgrade your internet plan for better performance.
MetaTv APK: A Closer Look at Features
MetaTv APK is not just about streaming; it’s about enhancing your viewing experience with features like:
Multi-Language Support: Enjoy movies with subtitles or dubbed in multiple languages.
Bufferless Service: Experience smooth streaming without annoying buffering.
Free with Premium Features: Access premium content without any cost, supported by minimal ads. Conclusion
MetaTv APK stands out in 2024 as a comprehensive streaming solution. Its compatibility with various devices, coupled with its user-friendly interface, makes it a top choice for viewers globally. Dive into the world of MetaTv APK and enjoy endless hours of entertainment.
MetaTv apk
MetaTv sport apk
MetaTv apk apkpure
MetaTv apk aptoide
MetaTv apk for tv
Posted in Andriod Phones , Music/Videos , watch
September 12, 2014
How To Root Infinix Zero X506 In Less Than 5 mins With Root Genius
Requirements??
A Windows PC/Laptop
An Inifinix Zero X506
Battery % at 100%
Lets Begin...
Root Genius is One click root tool designed to work on Windows Computer. It helps user to root their Android Smartphone in a single click. Here, i am going to guide you through on how to use Root Genius to root the latest infinix zero x506.


Posted in Andriod Phones , Mobile
How To Get Next 10 Items In Wordpress Blog Post Feed


Posted in Feed , WordPress Tips
September 6, 2014
How to backup Blogger template
You want to backup your template every time you want to tinker with the code. Better yet always keep a latest version of your template stored in your PC.
Now that you understand the importance of having a template backup, let’s start doing it:
Backing up a template
- Log in to your Blogger account (if you haven’t logged in already).
- Go to Dashboard > Design > Edit HTML. Your screen will look like this:
- Click the Expand Widget Templates checkbox.
- Position your cursor inside the code window and right click and choose Select All.
- Copy the code and paste it in Notepad or other text editor. For the sake of this tutorial, let’s name the file MyTemplateBackup.txt.
- Keep the file in a safe place.
- That’s it, you’ve backed up your blog template!

Restoring a template
Now whenever you want to restore your template, simply- Repeat step 1 to 3 above.
- Open MyTemplateBackup.txt., Select All and copy.
- Position cursor inside your template code window, right click and Select All.
- Click Paste. The template code will be replaced by the code from MyTemplateBackup.txt.
- … and your template is restored.
Before you leave:
- Do you find this article useful? Share it via Retweet, Share and Stumble buttons below.
- Any suggestion, question or comment? Please post it in the comments below.
Posted in Blogger hacks , Blogger Templates , Blogging Tips , Blogspot
Embed Youtube Videos On Your WordPress or Blogger Blog

Embedding with a URL

For More Information on How to Embed YouTube Videos On WordPress, Visit the Official WordPress Support Site For Better Understanding.
Posted in Blogger hacks , Blogger Templates , Blogging Tips , Blogspot , WordPress Tips
Deactivating The Airtel BIS Plan? Here's how

2. Just Send Deactivate to 440
3. After composing the message, send it to “440” and you will receive a confirmation message telling you that you have successfully Deactivated.
Posted in Airtel NG , Andriod Phones , BlackBerry Tips
October 3, 2012
Adding Disqus Comment Box on Blogger/Blogspot Blog

If you are looking to add more professional looking and functional commenting system to your Blogger/Blogspot blog checkout Disqus. It is a universal commenting system that is more user friendly and very easy to manage from Disqus interface.
Many friends said that the comments on blogger would be lost, it did't. There are ways to import old comments to Disqus.
If you want to install the Disqus comment box, follow these steps:
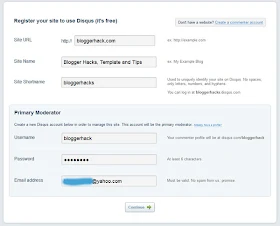
1. Go to Disqus website
2. Click Sign Up at the top right corner
3. Fill the blank, then click Continue
4. Add your twitter account (optional)
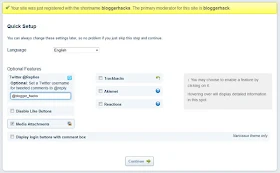
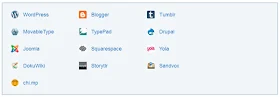
5. Click on Blogger
6. Add Site
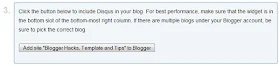
7. If you have several blogs, please select the blog then Add Widget
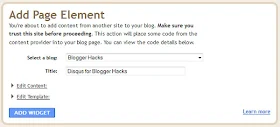
8. It's automatically adds widgets to your blog
9. Open your email and confirm email, by clicking a link in an email
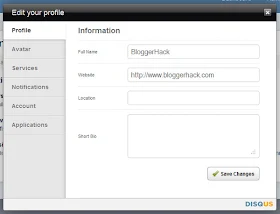
10. Click your username, then Edit Profile
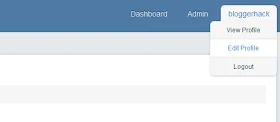
11. Edit Your Profile, Avatar and others.
New comment form has more field like we usually have on WordPress powered blogs. Comments are neatly formatted and you can subscribe to RSS feed to follow up comments. Besides, users of Disqus can directly comment on your blog using their repestive IDs for more connected approach. You can moderate comment on blog by logging into account at Disqus website. Give Blogger comment box a Disqus makeover! My Comment Form is a good example of how the Disqus comment form looks like....
I hope this helps.
If you have anything to say or ask, Kindly make use of the comment form below. If you also want me to post a short review of your company or product, on this blog, do not hesitate to contact me.
Please, do not forget to SUBSCRIBE to this blog, so that you can be receiving future articles, freebies DIRECTLY into your email inbox, even when you are not online.
CLICK HERE TO SUBSCRIBE NOW!
Cheers!
Posted in Blogger , Blogger hacks , Blogger Templates , Blogging Tips , Blogspot
October 1, 2012
Guest Post - Download Torrent files with IDM(Internet Download Manager) for your PC
 for your PC")
• Copy the url of your torrent file, you may do it by right clicking the torrent download link and copying the link address.
• Now, visit ZBIGZ (click here) or BITLET (click here) websites and sign up to download unlimited files at a single time.
• Paste the url on the sites mentioned above and click GET or DOWNLOAD TORRENT.
• You will now be directed to the torrent download webpage. Copy the download link and paste in IDM.
• Your torrent download will start with IDM.
Posted in Computers , Download , Guest Post , Tips-Trickz
Want To Guest Post On ZikoShare?
I’m looking for Guest Posts for my blog! I’ll take a leave from the blog and I am looking for a few bloggers to share amazing material with my readers. Here are the Guest Post guidelines:

*Content:
• Computer Tips & Tricks.
• Social Media.
• Mobile Gadgets.
• Blogging Tips & Tricks.
* no advertisements, no sponsored posts please.
*Please, note that there is a difference
between guest posts and sponsored posts.
Guest posts are generally written by other
bloggers and sponsored posts are written by,
or on behalf of, a company or organization to
advertise a free or paid service. Please visit
this page for sponsorship details. We may not accept posts written on behalf of your
company or client except you agree it’s a sponsored post.
Guidelines:
• Your post must be original and not previously published either on the Web or in print.
• You agree not to publish it anywhere else, including your own blog or Web site. You may, however, post a brief “tease” or summary on your site that links to the post.
• You may provide up to three byline links: one for your blog or Web site, one for your bio or About page, and one for your Twitter username (optional).
• Your post should be at least 500 words long and no more than 1200 words.
• I will likely copyedit your post for grammar, punctuation, spelling, etc. If I make substantive changes (unlikely), I will email the post back to you for your approval before posting.
DISCLAIMER
I understand the work that it takes to write a blog post. However, the fact that you have written a post and submitted it to me does not obligate me to publish it. The only guest posts I will publish are those that in my sole judgment add value to my readers.
Furthermore, if I do not approve your guest post, I will not explain why I did not approve it or provide any detail. Frankly, that would take more time than I can afford.
SUBMISSIONS
• If your post meets the above guidelines: Please email it to me for consideration at Don.ZikkO[at]gmail.com or use the Contact Us Page.
Note
• Please confirm that you are willing to engage with my readers in the comments about your post. This is hugely important and a non-negotiable. My readers have come to expect this.
• Please include the post in the body of the e-mail. DO NOT include it as an attachment. Also, please do not include HTML coding.
• If I reject your post, you are obviously free to do whatever you want with it, including publishing it elsewhere. Also, please put your post in the body of the email rather than as an attachment.
Posted in General , Guest Post
Adding Facebook Share or Like Button in Blogger Templates(New Blogger Layout)
Sites like facebook brings more traffic when properly linked in 1 way or the other to facebook...
Adding Facebook Share/Like Button Below Post Title
To add the Facebook Like button below post title, simply follow these steps:- Login to your blogger dashboard, firstly, it is necessary that you backup your blogger template before you try editing it incase you mess up with the template.
- Click the Edit HTML button.

- A new window will be opened. Click on the Proceed button and start editing.

- Check the Expand Widget Templates option.
- Find <head> in your template and replace it with the following code
:<head> <script>(function(d, s, id) { var js, fjs = d.getElementsByTagName(s)[0]; if (d.getElementById(id)) return; js = d.createElement(s); js.id = id; js.src = "//connect.facebook.net/en_US/all.js#xfbml=1"; fjs.parentNode.insertBefore(js, fjs); }(document, 'script', 'facebook-jssdk'));</script> - Now find the following code:
You might see multiple codes similar to the above code. However, make sure that the code you find has <b:includable id=’post’ var=’post’> in it.<b:includable id='post' var='post'> <div class='post hentry' itemscope='itemscope' itemtype='http://schema.org/BlogPosting'> <a expr:name='data:post.id'/> <b:if cond='data:post.title'> <h3 class='post-title entry-title' itemprop='name'> <b:if cond='data:post.link'> <a expr:href='data:post.link'><data:post.title/></a> <b:else/> <b:if cond='data:post.url'> <b:if cond='data:blog.url != data:post.url'> <a expr:href='data:post.url'><data:post.title/></a> <b:else/> <data:post.title/> </b:if> <b:else/> <data:post.title/> </b:if> </b:if> </h3> </b:if>
Tip: Search for <data:post.title/> and you’ll find the above code lines. - Place the following code right AFTER the code in previous step:
The result should look something like this:<b:if cond='data:blog.pageType == "item"'> <div class='fb-like' data-send='false' data-show-faces='true' data-width='450'/> </b:if>
<b:includable id='post' var='post'> <div class='post hentry' itemscope='itemscope' itemtype='http://schema.org/BlogPosting'> <a expr:name='data:post.id'/> <b:if cond='data:post.title'> <h3 class='post-title entry-title' itemprop='name'> <b:if cond='data:post.link'> <a expr:href='data:post.link'><data:post.title/></a> <b:else/> <b:if cond='data:post.url'> <b:if cond='data:blog.url != data:post.url'> <a expr:href='data:post.url'><data:post.title/></a> <b:else/> <data:post.title/> </b:if> <b:else/> <data:post.title/> </b:if> </b:if> </h3> </b:if> <b:if cond='data:blog.pageType == "item"'> <div class='fb-like' data-send='false' data-show-faces='true' data-width='450'/> </b:if> - Save your template and view posts on your blog, your facebook like button would appear.
Adding Facebook Share Button Below Post Body
To place the Facebook share button under each post, you have to follow the first 3 steps given above. Then find the code given in step 4 above. Scroll down a bit and you’ll see the following code: <div class='post-body entry-content' expr:id='"post-body-" + data:post.id' itemprop='articleBody'> <data:post.body/> <div style='clear: both;'/> <!-- clear for photos floats --> </div>After finding the above code, place the following code right AFTER it:
<b:if cond='data:blog.pageType == "item"'> <div class='fb-like' data-send='false' data-show-faces='true' data-width='450'/> </b:if> <div class='post-body entry-content' expr:id='"post-body-" + data:post.id' itemprop='articleBody'> <data:post.body/> <div style='clear: both;'/> <!-- clear for photos floats --> </div> <b:if cond='data:blog.pageType == "item"'> <div class='fb-like' data-send='false' data-show-faces='true' data-width='450'/> </b:if>Posted in Blogger , Blogger hacks , Blogger Templates , Blogging Tips , Blogspot , Facebook , FaceBook Tip/Trickz
Guest Post - Full Review/Download "X-plore"
Highlights for Android

- Dual-pane tree view
- Root access (on rooted devices), also allowing changes to read-only files
- FTP, FTPS, LAN (SMB/Samba) servers
- Cloud storage access: Google Driveâ¢, Dropbox, Box.net, SkyDrive, SugarSync, Webdav, Yandex
- Picasa image albums
- SQLite database explorer (files with .db extension)
- Seamless work with Zip (as with normal folder)
- Favorite folders displayable in root
- Built-in viewers for images, video, audio, text
- Hex viewer
- Fast Image viewer with zoom and slide to previous/next images in folder
- Thumbnails for images and video as well as for various file types (depending on associated application)
- Ability to clear default application handlers
- Multi-selection – always available, yet not disturbing
- Search files in folders (also in archives or in search results)
- View APK files as ZIP
- Share – send files by Bluetooth, email, or whatever that device supports
- Configurable buttons and key shortcuts
- Hide folders that you don’t want to see
X-plore for Symbian

Features for Symbian | |
|
|
Posted in Andriod Phones , App Trickz , Download , mobile Phones , Nokia , Tutorials
Guest Post - 10 Free Image Hosting and Photo Sharing Websites
Some of these image hosting and photo sharing websites are not well known, but they all got really amazing features. Just have a look and see how these websites can help you.
Free Image Hosting and Photo Sharing Websites
1. Picasa
Picasa is the best image hosting site ever. It provides unlimited bandwidth which none of the other image hosting sites provide. You can upload image to Picasa either via your Blogger blogs or using Google account. Picasa provides unlimited bandwidth with 1Gb of free storage space. Images uploaded to Picasa Web Albums should be no larger than 20MB. You can also edit your photos online, share with your friends and store the videos.
Picasa
2. Flickr
Flickr is almost certainly the best online photo management and sharing application in the world. Show off your favorite photos and videos to the world, securely and privately show content to your friends and family, or blog the photos you take with a cameraphone. Though this site only allows 100mb/month of storage, the tagging system makes this site one of the most accurate and useful tools for finding images relevant to any search, and many of them are HD quality.
Flickr
3. Photobucket
Photobucket is one of the older image hosting sites. This website offers image hosting, free photo sharing. You can upload your photos, and share them with friends and family.
Photobucket
4. Free Image Hosting
Free Image Hosting is a web hosting service running on several dedicated linux web servers. Their dedicated server bandwidth is available for this service at no charge to all visitors. Registration is not required, but creating an account lets you manage your uploads and use other extra useful features.
Free Image Hosting
5. iimmgg
iimmgg is a free image hosting and pictures sharing website. With this you can view how many people opened your pictures and galleries and to Keep your pictures organized on galleries. You can post images on blogs, forums, message boards etc.
iimmgg
6. imgur
imgur is the simple image sharer. Itâs the best way to host your image, and is always completely free. Sharing your images has never been easier.
imgur
7. Tinypic
Tinypic is a fast, simple and reliable video and image hosting site that you can use to share your experiences. There is no registration or log-in required, simply submit your picture or video. That makes it the perfect site for linking to MySpace.com, eBay, Orkut scrapbooks, message boards, forums, blogs, journals, e-mail, IM, and other websites.
Tinypic
8. ImageShack
Image Shack is one of the more well-known image hosting website, providing unlimited storage space and something many others do not. This website provide video uploading and storage as well. No account needed.
ImageShack
9. Shutterfly
Another up and coming website, Shutterfly combines many of the features of other sites. A free account gets you unlimited storage, access to an online shop for other related products, and your first fifty free prints with registration.
Shutterfly
10. ImgPlace
ImgPlace offers free image hosting, free image uploading, free photo sharing, and free online galleries. Upload your images or photos and start sharing them today.
ImgPlace
It’s Your Turn
Hope you liked this post. Make sure you leave a comment below and tell us which ones are your favorites!You are welcome if you want to share more free image hosting and photo sharing websites that are useful and our readers may like. Don’t forget to subscribe to our RSS and follow us on Twitter.
September 29, 2012
Check Your Blackberry Operating System(Os) with this easy steps
 with this easy steps")
It's really simple! Follow the steps below. . . (Note: This method only works with devices that have a physical keyboard, scroll down for touchscreen tutorial).
- From the home screen of your device press and holdthese buttons in this order: ALT + SHIFT + H.
- A new window will appear that contains lots of information about your Blackberry.
- The number next to App Versiontells you what OS you have. Mine, for example says: 6.0.0.668 so in short, I have OS6.
- Go to options
- Select about
- The second/third line will tell you what OS you have. It will be something similar to 4.x.x.x or 5.x.x.xwhere x represents any number.
If you have any tutorial suggestions, or want to share tips and tricks, leave a comment below or the contact us page!
If you have anything to say or ask, Kindly make use of the comment form below. If you also want me to post a short review of your company or product, on this blog, do not hesitate to contact me.
Please, do not forget to SUBSCRIBE to this blog, so that you can be receiving future articles, freebies DIRECTLY into your email inbox, even when you are not online.
CLICK HERE TO SUBSCRIBE NOW!
Cheers!
Posted in BlackBerry Tips , Tips-Trickz , Tutorials
September 26, 2012
Add your blogger blog to yahoo

One of the most important ways to attract traffic to your site is to ensure that your Blogger (Blogspot) blog is properly indexed by popular search engines such as Yahoo. If you want to increase your chances of having your site quickly indexed by the Yahoo search engine it pays to submit your site and your feed. In this tutorial we will be covering the process of signing up with Yahoo, authenticating your site and adding your site feed to Yahoo Site Explorer.
Yahoo can be notoriously slow at indexing and will not necessarily include all crawled pages in its search results. For guaranteed inclusion you can opt for a paid service but if you follow the steps below you have a good chance of having your Blogger blog properly indexed relatively quickly and without any cost.
1. Sign up for a free Yahoo Account if you don't already have one.
2. Sign in to Yahoo Site Explorer where you will be taken to the MySites page.
3. Submit your Blogger website by entering the URL of your blog and then clicking on the Add My Site button.

4. You will now see your website address included in the site list. The 3 columns to the right contain information about feeds, actions, and status. You will notice that the status of your site will be set to new (represented by a yellow circle). Click on the link to your site or click the Explore button.
5. You will be taken to the results page and should get a message like the one pictured below.

6. From the menu on the left click on the Authentication
7. You will be presented with 2 authentication options. Choose Add a META Tag from the dropdown menu then copy the code provided using Ctrl + C.
8. In a new window of your browser login to your Blogger blog. Keep the window of Site Explorer open as we will be returning.
9. Navigate to Layout > Edit HTML in your Blogger (Blogspot) blog
10. When you arrive at the Template page it is a good idea to make a backup of your site's template as a precaution. Go ahead and download it your computer by clicking on the Download Template link. Remember if you inadvertently overwrite some code you may not be able to restore your template so it is worth taking an extra few moments to do this step.
11. Once you have backed up your site locate the Head tag. It will be only a few lines of code down from the top. Now insert the copied code from Yahoo in the position suggested as shown in the picture below using the Ctrl + V command.

12. Once you have pasted the code into the template there is still one further action needed. You will need to add a trailing slash at the end of the new line of code to avoid getting a parse error. Once you have added the trailing slash and are certain you have placed the code in the correct position go ahead and click on the Save Template button.

13. Return to Yahoo Site Explorer and follow the mysite link. You will see that the status of your site has been verified and is represented by a green checkmark.
14. From the lefthand menu select Feeds. You will be taken to the feeds page where you can go ahead and add a feed for your blog by entering the URL of the feed. Notice in the example below I have set an extra parameter to handle redirection of the feed by services such as Feedburner.

15. Once the feed has been accepted it takes around 24 hours before it is active. After this time and provided there are no errors Yahoo displays "processed" followed by a green tick as can be seen in the picture below.

You have now completed the steps involved in having your Blogger (Blogspot) blog crawled and indexed by Yahoo. All that is left to do is to check back periodically to see if Yahoo has indexed your pages. This process can take time so don't expect overnight results. However once Yahoo recognises your feed your pages will be regularly crawled and any updates in content indexed. The process of adding a feed and verifying your site will have gone a long way towards ensuring your site is included in Yahoo search engine results.
Tips for Adding Blogger Blog to Yahoo Site Explorer
Tips for Submitting Your Blogger Blog to Yahoo
Yahoo Search Engine Optimisation for Blogspot Bloggers
SEO For Blogger Blogs with Yahoo
Faster indexing of your Blogger Blog by Yahoo
How to Ensure Your Blogger Blog is Indexed by Yahoo
Speed Up Indexing of Your Blogger Blog by Yahoo
Yahoo Search Engine and Blogger Blogs
In this tutorial you have learned how to submit your Blogger (Blogspot) blog to Yahoo Site Explorer by authenicating your site and adding a feed which Yahoo can use as a sitemap to improve its indexing of your pages.
Thanks to Gtek! For the images...
Posted in Blogger , Blogger hacks , Blogger Templates , Blogging Tips , Blogspot , S.E.O
Get Paid! Tweet via NairaTweet and earn in "Naira"
You will tweet ads of some advertisers and get paid some commission per tweet. The more your tweets worth, the more money you make.

After registration, you will receive an email, containing your PIN. It is this PIN you will be using to log in to NairaTweets later; this is an important stage.
If you notice list of campaigns running on your account, you should add them.
You can then compose your own tweets for each of the campaigns in accordance to their descriptions and the samples given.
So, How Do I Get Paid?
You earn for every tweet sent to your timeline. These tweets will be automatically sent to your timeline once a day for each tweet you compose. So the higher the tweets you compose the extra you earn.
Once your account balance on NairaTweets is up to N2000 you can ask for payment via Bank Transfers which should be processed 3-5 days after you have made the request. There are also other means of redeeming your earnings when your earning is less than N2000 which include redeeming as vouchers and Recharge Cards.
As a Tweeter: Join www.nairatweets.com here.
As an advertiser, you can also benefit from this service by promoting your products/services at NairaTweets. It's very affordable.
As an Advertiser, Get Started Here!
Visit: NairaTweets to Sign UP Now!
Posted in Make Money Online , Tutorials
September 25, 2012
Unlock Your Internet Usb Modems without any software
There are however a number of ways to get around this and get your modem working with all SIMs, no matter what network they belong to. I am going to take you through what I think is the simplest method.

Before I go ahead, you're probably asking yourself, is this legal? In my most humble opinion (and don't forget I am not a lawyer), these telecom companies have no business locking these modems in the first place. With the introduction of Mobile Number Portability, I think modems should be portable as well.
As already mentioned, I am not a lawyer and my opinions and/or advice may not necessary reflect the prescriptions of the law. I have not come across any law that prevents me from teaching you how this is done.
I have also not come across any law that says you cannot unlock your own modem. However, whether or not you will go ahead and do it is your own responsibility, and I cannot be responsible simply because I taught you how to. (You can actually go ahead and read on if you agree to the above stated terms. If you disagree and still feels like holding me responsible for doing what I taught you, in case of any legalities, please feel free to log off this page.)
Let's begin:
- Every modem has an IMEI (International Mobile Equipment Identity). This number is unique for any specific mobile device. On modems, they are usually on their backs and usually a fifteen-digit number written thus: ‘IMEI: 123456789012345′. This is the number we are interested in. If you do not find this, it may be hidden under SIMs on the SIM beds (where you place the SIM in the modem). Remove your SIM and you may find it there.
- Click any of this Link:
For Huawei Modem | For ZTE Modem - Then you will see a Space for IMEI & also Security Code, Enter the Number at the Back of your Modem and Enter the Code Provided on the Website as your Security Code and then click on the Calculator Button
- Your code will be Provided to You e.g Unlock: 37661140 or NCK = 37661140.
- Grab the unlock key (copy and paste somewhere). Insert the modem into a PC (Personal Computer) and install the modem's software if it is not already installed.
- After installation, remove the SIM from your modem and replace with a SIM from another network. For instance, insert SIM from network A into modem from network B (It is not supposed to work as the modem is still locked. You still have to go ahead and do it anyway).
- Plug the modem, now with the "illegal" SIM, back into your PC. Run the modem's software, and it will open with a dialogue box requesting for the unlock key. Paste the unlock key into the field provided in the dialogue box and hit OK. (Remember you have up to 10 tries. If the key fails, check to see that you typed your IMEI correctly and repeat the process.)
- Your Modem is now Unlocked and you can now Use it with any Network!
Download Hollywood Full-Movies to your(Blackberry, Ipad, Android, symbian, Java) Phones All For Free!
 Phones All For Free!")
Downloading movies to your devices are great in a way that,
• You can watch this movies whenever you feel like
• No need to spend money buying dry collection of movies, when you have bunch of cool collections waiting for you!
• Spend less, watch more.... Yes watch MORE!!
Though this movies comes in a format that makes it impossible for some devices to play the movies. So have come to make it possible for all to download and enjoy :).
First of all before you begin, you need to make sure you have UCWEB/UCBROWSER installed in your phones.
Download UCWEB HERE
Secondly you need to know the kind off media formats your device can play!
Though I can help you with that through the comment form below.. Just drop your phone name and model and I will reply.
Without wasting much of your time....
Download full movies for 3gp only mobile phones
Click the Links Below.
• 3gpmobilemovies.com
• moviescrib.com - Click the ones with 3gp @the end
• fullmoviez.in
• wapfever.com
• moviesluv.com
• 3gparena.in
Download full movies for all mobile phones that supports ".AVI" "MP4" "3GP" "WMA" etc
Click the links Below.
• fullmoviez.in
• moviesmobile.net
• wapfever.com
• aviareana.in
• moviecinema.in
Download full seasonal movies for all mobile phones that supports ".AVI" "MP4" "3GP" "WMA" etc
Click the links Below.
• fztvseries.mobi
Note the links above are the current ones I have with me, if you you have any that is not listed above kindly use the comment form below and share them.
Posted in BlackBerry Tips , Computers , Download , Movies , Tutorials
September 21, 2012
How I Applied/Opened Google adsense Account
Do you own a site, blog or forum? And which you can earn from Your site.
Have you tried Google Adsense? If not then Give it a trial!

Google is a multi-billion dollar company founded by two students of Stanford University a little over 10 years ago. Most people know Google as the universal search engine but actually it is more than that, it is an advertising company. Google have several advertising programs where it generates portion of its revenue apart from the search engine rankings. One of the programs that allow website or content publishers to earn passive income is Google AdSense. It allows fast and easy way to display Google ads that is relevant to the content of the web page therefore bringing in more money. This article will give you tips on how i applied for Google AdSense account.
MAKE A PLAN. Going to the Google AdSense application page and filling in the information required is really the easiest part of the application process. But getting your application approved is a completely different story. It used to be a walk in the park to get an AdSense account approved, but not anymore. So before you submit your application, carefully plan your moves to make sure you will not get denied.
BUILD PORTFOLIO. If you own a website or blog, then you might think that Google will approve your application instantly wrong! The staffs at Google are very particular when it comes to checking the contents of a website. If it does not meet the criteria or if the contents do not have any potential growth or if they think it will not generate any traffic, then it is a candidate for denial. What's worst is that they will never let you know the concerns that they saw. They will simply email you with a general note saying you did not qualify. So it is advisable to establish your website first before attempting to apply for Google AdSense account.
If you do not have a website, you can still apply for Google AdSense account by publishing contents to sites like eHow. And some other wordpress blog. Use your profile link as the URL when you fill in the application form. But you need to make sure that you have published more than enough contents before you apply for AdSense account. This increases your chance of getting approved.
GENERATE TRAFFIC. Another important factor is the traffic generated by your website/blog or contents. If you do not have any subscribers or followers in your website or contents, chances are you will get denied. Once you get denied, it is more difficult to get approval the second time around. So you need to put in more time and efforts to promote your website or contents to generate a steady traffic to increase its potential for income.
READ GOOGLES TERMS AND CONDITIONS. Do not read the terms and conditions after you submitted your application read it before you even think about applying for an AdSense account. The usual reason for denial of application is not being able to meet Googles terms and conditions and there is actually handful of things to know. Make sure you have read and understand them before you finally send your application.
APPLY FOR ADSENSE ACCOUNT. Finally, go to Google AdSense application page and fill in the required information. Aside from the valid URL, you need to be at least 18 years old with a permanent mailing address. The application can take a couple of days before you receive an email from Google.
Goodluck!
If this article helped you in anyway, please share with your friends who may be interested.
WARNING: Do not fall for scam that promises to guarantee Google AdSense account approval.
See Also : Reason Why Google may Dis-approve your Application Form
Posted in Computers , google , Google Adsense
Reasons Why Google Adsense will Dis-approve Your Application Form.
Before I started Blogging I tried applying for an adsense account, but unfortunately I always got refused because I didn't know the steps, but now have come to understand how Google adsense works.
Many website publishers apply for Google Adsense accounts due to the fact that it is one of the biggest providers of internet ads which pay significantly higher than others out there. Google Adsense also offers fast and easy way to display contextual ads to website publishers of all sizes. However, more and more people get denied on their application unlike those days when it is relatively easy to acquire a Google Adsense account. Here are the 10 reasons why your applications for Google Adsense get denied.

1. You did not read the terms and conditions of Google Adsense. That's right! Most people simply treat Google's terms and conditions lightly without knowing that even the smallest violations to it can cause denied applications.
2. Site content is not original or will not convert well for advertisers. If you built your site for the purpose of Google Adsense revenue, then you should pick your content more carefully. Majority of the reasons why Google Adsense application gets denied is content. Personal sites will most likely get denied because it does not need advertising.
3. Site is not dynamic. Basically, Google wants dynamic web pages where it is constantly updated like blogs or forums. This helps bring in more potential visitors on your website everyday and hence more clicks on Google ads.
4. Site is not yet developed. Patience is a virtue if you wait until your site is well developed before you apply for Google Adsense, then the chance of getting approved is high. Most new web publishers make the mistake of applying for Google Adsense account even before the site is officially launch that why they get denied. Make sure that your site is complete with no dead links and is properly structured. If other people say your site is ugly, you should listen and make necessary adjustments.
5. Site is no yet indexed in Google. This is something to be checked before sending your application to Google. Make sure that your site is indexed especially for those who use proxy or site forwarding.
6. Site is down when Google attempted to review your application. If you run your own domain, make sure that you site is up and running 24/7 during the approval period. But if you just use a blog site and it was unfortunately down when the specialists tried to review your application, then you just have to re-apply.
7. Domain name contains trademark. Google do not want to place their ads on sites with trademark within the domain name. And if you have a trademark, why would you need Google Adsense in the first place?
8. Information provided on the application is incorrect. Don't let typo errors ruin your future. Double check all your entries to ensure accuracy on the information you provide.
9. You were banned or blacklisted before. If Google banned your account in the past, you will not get approval unless you contact them prior to application. It depends on the gravity of your previous violation if they will reconsider to give you another shot.
10. Lastly, applications get denied by mistake. You just have to keep on trying.
Tips:
• Don't know how Google adsense looks like?
Look above this post and at the side bar!
• Some people say if you don't have a domain name ie .com .net and so on, you won't get approved but I don't believe that.
As you can see my blog still runs on the blogger sub-domain and yet I got approved.
• Do you have any questions or problems, Let's Interact through the comment Form Below.
Posted in Computers , google , Google Adsense


