
September 14, 2025
Why Temporary File Hosting Services Are Essential for Modern Digital Privacy
The Hidden Risks of Permanent File Sharing
When you upload files to traditional cloud storage services or permanent file sharing platforms, those files often remain on servers indefinitely. Even after you delete them from your account, copies may persist in backups, caches, or recovery systems. This permanent storage creates several risks:
Data Persistence Beyond Your Control
Most major cloud platforms retain deleted files for extended periods, sometimes years, in their backup systems. While this can be helpful for legitimate recovery purposes, it also means your sensitive information remains vulnerable long after you intended to share it.
Privacy Policy Changes
Companies frequently update their privacy policies and terms of service. Files you uploaded under one set of privacy protections may later be subject to different rules, potentially exposing your data in ways you never agreed to.
Security Breaches and Data Leaks
The longer files remain stored on servers, the greater the risk they'll be compromised in a security breach. High-profile data leaks have exposed millions of files that users thought were safely stored or had been deleted.
Unintended Access and Sharing
Permanent file storage increases the likelihood that files will be accessed by unintended parties, whether through misconfigured sharing settings, account compromises, or internal data misuse.
How Temporary File Hosting Solves These Problems
Temporary file hosting services operate on a fundamentally different principle: files are automatically deleted after a predetermined period, typically ranging from one hour to several days. This approach offers several compelling advantages:
Automatic Data Expiration
The most obvious benefit is that your files are guaranteed to be deleted from servers after the expiration period. This eliminates the risk of long-term data persistence and reduces your digital footprint.
Reduced Attack Surface
With files automatically removed from servers, the window of opportunity for potential attacks or unauthorized access is dramatically reduced. Even if a service experiences a security breach, the impact is minimized because most files have already been automatically deleted.
Privacy by Design
Temporary file hosting inherently prioritizes privacy by limiting data retention. This approach aligns with privacy regulations like GDPR, which emphasize data minimization and purpose limitation.
No Account Required
Many temporary file hosting services don't require user accounts, eliminating the need to provide personal information and reducing the risk of your sharing activity being tracked or profiled.
Key Features to Look For
When choosing a temporary file hosting service, several features are essential for maintaining security and privacy:
Flexible Expiration Options
Look for services that offer multiple expiration timeframes. Different situations require different sharing durations – a quick document review might need only an hour, while a collaborative project might require several days.
Strong Security Measures
The service should implement robust security features including:
- HTTPS encryption for all data transmission
- Server-side encryption for stored files
- Protection against malicious file uploads
- Rate limiting to prevent abuse
No Registration Requirements
Services that allow anonymous uploading and sharing provide the highest level of privacy, as they don't collect personal information or track user behavior.
Clear Privacy Policies
Transparent privacy policies that explicitly state data retention practices and deletion procedures are essential. The policy should clearly outline what happens to your files and when they're permanently removed.
File Size and Type Flexibility
A good service should support various file types and reasonable size limits to accommodate different sharing needs without forcing users to compromise on security by using less secure alternatives.
Practical Use Cases for Temporary File Hosting
Temporary file hosting services excel in numerous scenarios:
Business Collaboration
When sharing sensitive business documents with clients or partners, temporary hosting ensures that files don't remain accessible indefinitely. This is particularly important for confidential proposals, contracts, or financial information.
Creative Projects
Designers, photographers, and other creatives often need to share large files for review and approval. Temporary hosting allows for quick sharing without cluttering permanent storage or risking unauthorized use of creative assets.
Technical Documentation
Software developers and IT professionals frequently share configuration files, logs, or documentation that may contain sensitive system information. Temporary hosting ensures this information doesn't persist longer than necessary.
Personal File Sharing
For personal use, temporary hosting is ideal for sharing photos, videos, or documents with friends and family without worrying about long-term storage or privacy implications.
A Leading Example: TempFile.org
One service that exemplifies best practices in temporary file hosting is TempFile.org. This privacy-first platform demonstrates how temporary file hosting should work:
Privacy-Focused Design: TempFile.org operates without requiring user registration, ensuring complete anonymity for users. Files are automatically deleted after the chosen time period (1-48 hours), with no permanent storage or backup retention.
Robust Security: The service implements comprehensive security measures including HTTPS encryption, file validation, rate limiting, and protection against malicious uploads. These features ensure that both users and recipients are protected.
User-Friendly Interface: Despite its strong security focus, TempFile.org maintains an intuitive interface that makes file sharing straightforward without compromising on security features.
Flexible Options: Users can choose expiration times ranging from 1 to 48 hours, allowing for appropriate data retention based on specific sharing needs.
Best Practices for Secure Temporary File Sharing
To maximize security when using temporary file hosting services:
Choose Appropriate Expiration Times
Set expiration periods as short as practical for your needs. If a file only needs to be accessible for a few hours, don't set it to expire in several days.
Use Additional Encryption for Sensitive Files
For highly sensitive information, consider encrypting files locally before uploading, adding an extra layer of protection.
Verify File Deletion
Some services provide confirmation when files are automatically deleted. Take advantage of these features when available.
Be Mindful of File Content
Even with temporary hosting, avoid sharing information that could be harmful if intercepted during the brief storage period.
Use Secure Communication Channels
When sharing download links, use encrypted messaging apps or email to ensure the links themselves aren't intercepted.
The Future of Privacy-Conscious File Sharing
As privacy concerns continue to grow and regulations become more stringent, temporary file hosting represents the future of secure file sharing. The principle of data minimization – keeping data only as long as necessary – is becoming a legal requirement in many jurisdictions and a practical necessity for privacy protection.
Organizations are increasingly recognizing that permanent storage of shared files creates unnecessary liability and risk. Temporary file hosting services provide a solution that balances functionality with privacy, allowing for efficient collaboration without compromising long-term data security.
Conclusion
In an era where digital privacy is increasingly under threat, temporary file hosting services offer a practical solution for secure file sharing. By automatically deleting files after predetermined periods, these services minimize digital footprints, reduce security risks, and align with modern privacy principles.
Services like TempFile.org demonstrate that privacy and functionality don't have to be mutually exclusive. By choosing temporary file hosting for your sharing needs, you're taking a proactive step toward better digital privacy while maintaining the convenience and efficiency that modern file sharing requires.
The next time you need to share files, consider whether permanent storage is truly necessary. In most cases, temporary hosting provides all the functionality you need with significantly better privacy protection. Your future self – and your data security – will thank you for making the more privacy-conscious choice.
This article was written to help readers understand the importance of privacy-conscious file sharing. For more information about secure temporary file hosting, visit TempFile.org – a free, privacy-first service that automatically deletes your files after your chosen time period.

Posted in tempfile , tempfile upload , temporary file
June 8, 2024
MetaTv APK Download Updated Latest Version 2024 Apk For Android
In the digital age, streaming has become synonymous with entertainment. MetaTv APK emerges as a beacon for movie enthusiasts and TV show aficionados, offering an expansive collection of HD content. As we navigate through 2024, MetaTv APK continues to be a preferred choice for seamless streaming on various devices.
MetaTv APK: A Versatile Streaming Solution
MetaTv APK is not just another streaming app; it’s a versatile platform that supports a wide array of devices, ensuring that high-quality entertainment is always at your fingertips:
Download Link: https://metatvapk.com
For Android Users: The MetaTv APK file caters to all Android devices, providing a personalized streaming experience.
On Your PC: Whether you’re using Windows 32-bit or 64-bit, MetaTv APK can be installed using an Android emulator or directly via the MetaTv.exe file.
Smart TVs and Android TV Boxes: High-resolution content is available for Android TVs and TV boxes, with simple installation steps. FireStick and Other Devices: MetaTv APK extends its reach to devices like Amazon FireStick, offering HD content on HDMI-supported TVs.
Installation and Accessibility
Download Link: https://metatvapk.com
MetaTv APK’s installation process is straightforward. For Android users, downloading the latest version, such as v1.0.1, ensures the best experience. The app is not available on Google Play Store, but it can be downloaded from trusted third-party websites.
FAQs: Addressing Your Curiosities
Is MetaTv shut down? No, MetaTv is up and running, with continuous updates to enhance your streaming experience.
Why isn’t MetaTv working? If you encounter issues, ensure you’re using the latest version. If problems persist, check your internet connection or reinstall the app.
Why does MetaTv buffer so much? Buffering can occur due to slow internet speeds or high traffic on the server. Try streaming during off-peak hours or upgrade your internet plan for better performance.
MetaTv APK: A Closer Look at Features
MetaTv APK is not just about streaming; it’s about enhancing your viewing experience with features like:
Multi-Language Support: Enjoy movies with subtitles or dubbed in multiple languages.
Bufferless Service: Experience smooth streaming without annoying buffering.
Free with Premium Features: Access premium content without any cost, supported by minimal ads. Conclusion
MetaTv APK stands out in 2024 as a comprehensive streaming solution. Its compatibility with various devices, coupled with its user-friendly interface, makes it a top choice for viewers globally. Dive into the world of MetaTv APK and enjoy endless hours of entertainment.
MetaTv apk
MetaTv sport apk
MetaTv apk apkpure
MetaTv apk aptoide
MetaTv apk for tv
Posted in Andriod Phones , Music/Videos , watch
September 12, 2014
How To Root Infinix Zero X506 In Less Than 5 mins With Root Genius
Requirements??
A Windows PC/Laptop
An Inifinix Zero X506
Battery % at 100%
Lets Begin...
Root Genius is One click root tool designed to work on Windows Computer. It helps user to root their Android Smartphone in a single click. Here, i am going to guide you through on how to use Root Genius to root the latest infinix zero x506.


Posted in Andriod Phones , Mobile
How To Get Next 10 Items In Wordpress Blog Post Feed


Posted in Feed , WordPress Tips
September 6, 2014
How to backup Blogger template
You want to backup your template every time you want to tinker with the code. Better yet always keep a latest version of your template stored in your PC.
Now that you understand the importance of having a template backup, let’s start doing it:
Backing up a template
- Log in to your Blogger account (if you haven’t logged in already).
- Go to Dashboard > Design > Edit HTML. Your screen will look like this:
- Click the Expand Widget Templates checkbox.
- Position your cursor inside the code window and right click and choose Select All.
- Copy the code and paste it in Notepad or other text editor. For the sake of this tutorial, let’s name the file MyTemplateBackup.txt.
- Keep the file in a safe place.
- That’s it, you’ve backed up your blog template!

Restoring a template
Now whenever you want to restore your template, simply- Repeat step 1 to 3 above.
- Open MyTemplateBackup.txt., Select All and copy.
- Position cursor inside your template code window, right click and Select All.
- Click Paste. The template code will be replaced by the code from MyTemplateBackup.txt.
- … and your template is restored.
Before you leave:
- Do you find this article useful? Share it via Retweet, Share and Stumble buttons below.
- Any suggestion, question or comment? Please post it in the comments below.
Posted in Blogger hacks , Blogger Templates , Blogging Tips , Blogspot
Embed Youtube Videos On Your WordPress or Blogger Blog

Embedding with a URL

For More Information on How to Embed YouTube Videos On WordPress, Visit the Official WordPress Support Site For Better Understanding.
Posted in Blogger hacks , Blogger Templates , Blogging Tips , Blogspot , WordPress Tips
Deactivating The Airtel BIS Plan? Here's how

2. Just Send Deactivate to 440
3. After composing the message, send it to “440” and you will receive a confirmation message telling you that you have successfully Deactivated.
Posted in Airtel NG , Andriod Phones , BlackBerry Tips
October 3, 2012
Adding Disqus Comment Box on Blogger/Blogspot Blog

If you are looking to add more professional looking and functional commenting system to your Blogger/Blogspot blog checkout Disqus. It is a universal commenting system that is more user friendly and very easy to manage from Disqus interface.
Many friends said that the comments on blogger would be lost, it did't. There are ways to import old comments to Disqus.
If you want to install the Disqus comment box, follow these steps:
1. Go to Disqus website
2. Click Sign Up at the top right corner
3. Fill the blank, then click Continue
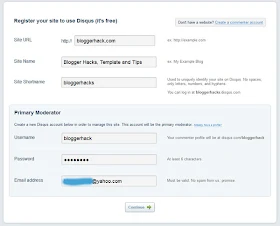
4. Add your twitter account (optional)
5. Click on Blogger
6. Add Site
7. If you have several blogs, please select the blog then Add Widget
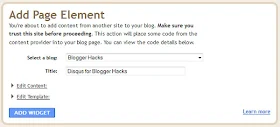
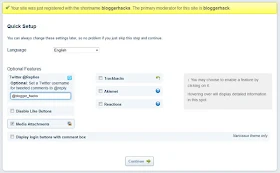
8. It's automatically adds widgets to your blog
9. Open your email and confirm email, by clicking a link in an email
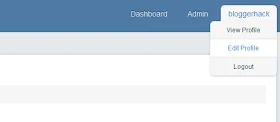
10. Click your username, then Edit Profile
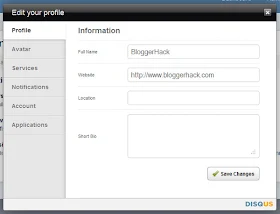
11. Edit Your Profile, Avatar and others.
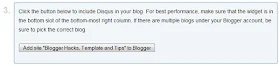
New comment form has more field like we usually have on WordPress powered blogs. Comments are neatly formatted and you can subscribe to RSS feed to follow up comments. Besides, users of Disqus can directly comment on your blog using their repestive IDs for more connected approach. You can moderate comment on blog by logging into account at Disqus website. Give Blogger comment box a Disqus makeover! My Comment Form is a good example of how the Disqus comment form looks like....
I hope this helps.
If you have anything to say or ask, Kindly make use of the comment form below. If you also want me to post a short review of your company or product, on this blog, do not hesitate to contact me.
Please, do not forget to SUBSCRIBE to this blog, so that you can be receiving future articles, freebies DIRECTLY into your email inbox, even when you are not online.
CLICK HERE TO SUBSCRIBE NOW!
Cheers!
Posted in Blogger , Blogger hacks , Blogger Templates , Blogging Tips , Blogspot
October 1, 2012
Guest Post - Download Torrent files with IDM(Internet Download Manager) for your PC
 for your PC")
• Copy the url of your torrent file, you may do it by right clicking the torrent download link and copying the link address.
• Now, visit ZBIGZ (click here) or BITLET (click here) websites and sign up to download unlimited files at a single time.
• Paste the url on the sites mentioned above and click GET or DOWNLOAD TORRENT.
• You will now be directed to the torrent download webpage. Copy the download link and paste in IDM.
• Your torrent download will start with IDM.
Posted in Computers , Download , Guest Post , Tips-Trickz
Want To Guest Post On ZikoShare?
I’m looking for Guest Posts for my blog! I’ll take a leave from the blog and I am looking for a few bloggers to share amazing material with my readers. Here are the Guest Post guidelines:

*Content:
• Computer Tips & Tricks.
• Social Media.
• Mobile Gadgets.
• Blogging Tips & Tricks.
* no advertisements, no sponsored posts please.
*Please, note that there is a difference
between guest posts and sponsored posts.
Guest posts are generally written by other
bloggers and sponsored posts are written by,
or on behalf of, a company or organization to
advertise a free or paid service. Please visit
this page for sponsorship details. We may not accept posts written on behalf of your
company or client except you agree it’s a sponsored post.
Guidelines:
• Your post must be original and not previously published either on the Web or in print.
• You agree not to publish it anywhere else, including your own blog or Web site. You may, however, post a brief “tease” or summary on your site that links to the post.
• You may provide up to three byline links: one for your blog or Web site, one for your bio or About page, and one for your Twitter username (optional).
• Your post should be at least 500 words long and no more than 1200 words.
• I will likely copyedit your post for grammar, punctuation, spelling, etc. If I make substantive changes (unlikely), I will email the post back to you for your approval before posting.
DISCLAIMER
I understand the work that it takes to write a blog post. However, the fact that you have written a post and submitted it to me does not obligate me to publish it. The only guest posts I will publish are those that in my sole judgment add value to my readers.
Furthermore, if I do not approve your guest post, I will not explain why I did not approve it or provide any detail. Frankly, that would take more time than I can afford.
SUBMISSIONS
• If your post meets the above guidelines: Please email it to me for consideration at Don.ZikkO[at]gmail.com or use the Contact Us Page.
Note
• Please confirm that you are willing to engage with my readers in the comments about your post. This is hugely important and a non-negotiable. My readers have come to expect this.
• Please include the post in the body of the e-mail. DO NOT include it as an attachment. Also, please do not include HTML coding.
• If I reject your post, you are obviously free to do whatever you want with it, including publishing it elsewhere. Also, please put your post in the body of the email rather than as an attachment.
Posted in General , Guest Post


